Tuesday 19 February 2013

Cracking a windows password based security


In my previous post here, I talked about how hard it is to trust the cyber space in which our most valuable information passes through. Well today I wish to be the devil’s advocate and show you how to crack a window based password security. Don’t get me wrong but there are numerous situations which will warrant the need to have the password cracked but if security is you hobby then doing what we call professional hacking might be your excuse.
So what do you need? Below is a list of the tool you will need.
1.    A Linux based operating system, preferably on a CD/DVD.(I use Ubuntu)
2.    A windows password file reset tool.
3.    Another windows machine which you have access to.
4.    You attention might be a useful tool too. J
Before we start its important to note that in dual boot systems, usually the Linux based system such as ubuntu can access a windows file system and that will be the basis of our password cracking.
The next thing to know is that windows passwords are stored in a file called SAM which is found in the directory
C:\WINDOWS\SYSTEM32\CONFIG\
1.    Shutdown down your machine.
2.    Boot from the Ubuntu CD (or whatever similar based Linux variant you have).
3.    When its fully boots access the folder in the path above then copy the  file named SAM.
4.    Now go back to the other windows machine and paste the SAM file wherever probably on the desktop.
5.    Run the password file reset tool which can be downloaded from here.
Note that there are multiple password reset tool some which a free with other being proprietary.


From the screenshot above, it’s clear what you need to do. Select the location of the SAM file then click (RE) open.
It will list all the user account available in the machine and then when you click on an account the unlock or change password button will be activated. Play around to fit your needs.
6.    Exit from the tool and confirm that the file has been edited by right clicking then going to properties.
7.    Copy the file from where you got it from.
We are done and your password have been either changed or completely removed.

Saturday 9 February 2013

How to configure an SSL powered virtual host using XAMPP in windows and generating/self signing an SSL certificate


The month of February is a month of love. This is the month when most of the chocolate establishments make have their revenues. Now talking about love, love is one thing that is based on trust. You cannot have the later without the former. However nobody and especially those responsible for enterprise applications can afford the luxury of trusting the paths in which the valued information passes. 
Let’s try to understand what am talking about. Most  systems are web based and even more now that as I said in an earlier post the word cloud no longer means the  sign of  rain. Now when a company employee uses a web browser to  access the company system  then they are trying to request data from a remote server. This will involve the initial login which involves passing the username and password. The browser will encrypt the password for you but after that all that information that is passed along is open to tapping by a person with the right tools usually called the Adversary or simply the hacker.
Inorder to make sure that this does not happen , we need to encrypt all the requests coming from the client and decrypt them at the server and viceversa.  This involves creating a host which supports communication over the protocol : https.
1.    We start this procedure by editing the httpd-vhosts.conf found at the path xampp\apache\conf\extra.
Delete the scripts you have now from the previous post and replace with the one below.
<VirtualHost www.thetaitanstore.com:443>
    ServerAdmin admin@thetaitanstore.com
    DocumentRoot "D:\Virtual Sites hosted here\thetaitanstore"
    ServerName www.thetaitanstore.com
    ServerAlias thetaitanstore.com

    SSLEngine on
    SSLOptions +FakeBasicAuth +ExportCertData +StrictRequire
    SSLCertificateFile "C:\xampp\apache\conf\ssl.crt\server.crt"
    SSLCertificateKeyFile  "C:\xampp\apache\conf\ssl.key\server.key"

    CustomLog "D:\Virtual Sites hosted here\thetaitanstore\logs\access" common

<Directory />
           Options FollowSymLinks
           AllowOverride None
</Directory>
<Directory "D:\Virtual Sites hosted here\thetaitanstore">
           Options Indexes FollowSymLinks MultiViews
           AllowOverride FileInfo
           Order allow,deny
           allow from all
</Directory>
</VirtualHost>

Note that the SSL communications are now being done through port 443 as opposed to port 80.
The script above shows that we have a private key file and a public key file. These are contained in the SSL certificates for authentication purposes. So now let’s go on and generate our own SSL certificate.
In order to enable the encryption of your password, you must create an SSL certificiate (containing your public key) and a server private key. XAMPP provides a default certificate/key that can be used, but it is better to create a new one since the default key is available to anyone who downloads XAMPP. If someone knows your key, they can decrypt your packets.
XAMPP provides a batch file for creating a new certificate/key with random encryption keys. To execute this batch file, do the following:
  1. Open a command window (Start->Run, type “cmd” and press “OK)
  2. cd c:\xampp\apache
  3. makecert
You will then see this:
C:\xampp\apache>newcert
Loading 'screen' into random state - done
Generating a 1024 bit RSA private key
............................++++++
.....................................++++++
writing new private key to 'privkey.pem'
Enter PEM pass phrase:
Enter in a pass phrase for decrypting your private server key, and press Enter. Write down this passphrase so you don’t forget it. Now you will be asked to verify it:
Verifying - Enter PEM pass phrase:
Enter your passphrase a second time and hit Enter. Now, you’ll see this:
-----
You are about to be asked to enter information that will be incorporatedinto your certificate request.What you are about to enter is what is called a Distinguished Name or a DN.There are quite a few fields but you can leave some blank.
For some fields there will be a default value,
If you enter '.', the field will be left blank.
-----
Country Name (2 letter code) [AU]:
Enter in your 2 letter country code. You’ll be asked for a few more items (shown below). Enter is what you think is most appropriate, but stop when you are asked for “Common Name”
State or Province Name (full name) [Some-State]:KE
Locality Name (eg, city) []:NAIROBI
Organization Name (eg, company) [CREATIVE COMMONS]: THE TAITAN STORE
Organizational Unit Name (eg, section) []:
Common Name (eg, YOUR name) []:www.thetaitanstore.com
For “Common Name”, you need to enter in the DNS name or IP address of your website. The name that you enter in here will need to match the server name that is entered into the browser that is accessing the page. It is important that this common name match the address that goes into a browser, otherwise you will get extra warnings when navigating to your secure web pages. If you are running this website over the public internet on an IP address that changes sometimes, you can use a Dynamic DNS service such as dyndns.org to get a free domain name that always points to your server. After you enter in the “Common Name”, you are asked for more information. Fill in what you think is appropriate, but it is OK to just hit ENTER to accept the defaults. Eventually, you will be asked for the pass phrase for privkey.pem:
Email Address []:

Please enter the following 'extra' attributesto be sent with your certificate request
A challenge password []:
An optional company name []:
Enter pass phrase for privkey.pem:
4.      Enter the pass phrase that you created earlier, and now you will see this:
writing RSA key
Loading 'screen' into random state - done
Signature ok
subject=/C=xx/ST=xx/L=xxxx/O=xxx/CN=commonname
Getting Private key
—–
Das Zertifikat wurde erstellt.
The certificate was provided.

Press any key to continue . . .

C:\xampp\apache>
You are now finished creating your SSL certificate and private key. The makecert.bat script will move your server private key and certificates in the appropriate directories for you.
3.    Remember to restart Apache for the configuration changes to take effect.
            Now you have your fully configured SSL powered virtual host.

Tuesday 29 January 2013

Configure a virtual host using XAMPP in windows


In this post you are going to learn how to configure a virtual host from a windows environment using XAMPP. XAMPP is pretty popular for all apprentices who really wanna learn their trade and it can’t get better than even having you own host instead of having to place everything  inside the htdocs folder. 
What do we mean by virtual host? Think of it as this , when you do domain name registration you start by doing a search to make sure that the name you look for is not taken. After you are successful then the next step involves getting a suitable host where your web application files will reside. In this post  we combine both those processes into one but only on your development machine.

1. Edit the file httpd-vhosts.conf found at the directory C:\xampp\apache\conf\extra.  Insert the following configuration script. 
<VirtualHost www.thetaitanstore.com:80>
    ServerAdmin admin@thetaitanstore.com
    DocumentRoot "D:\Virtual Sites hosted here\thetaitanstore"
    ServerName www.thetaitanstore.com
    ServerAlias thetaitanstore.com

   
    CustomLog "D:\Virtual Sites hosted here\thetaitanstore\logs\access" common

    <Directory />
           Options FollowSymLinks
           AllowOverride None
    </Directory>
    <Directory "D:\Virtual Sites hosted here\thetaitanstore">
           Options Indexes FollowSymLinks MultiViews
           AllowOverride FileInfo
           Order allow,deny
           allow from all
    </Directory>
</VirtualHost>

2. Since we now have told Apache that we have a new site we are hosting let tell the connections controller that if we type the address www.thetaitanstore.com the browser wont try to somewhere on the internet but just redirect around the localhost. This is done by editing the hosts file.  Its located in this path

C:\Windows\System32\drivers\etc

Insert the entry 

127.0.0.1  www.thetaitanstore.com

3. Now go on and restart Apache from services to detect the configuration changes. 

In the next post we will talk about how we can make this virtual host to support SSL(Secure Sockets Layer) communications. 


Monday 21 January 2013

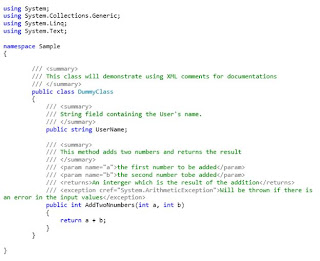
C# documentation using XML comments

During my initial days in the field of software development when the waterfall method was the in thing, we were told that documentation was a task that was to be performed somewhere at the end of the software development process. However as the number of modules get complex and with constantly changing requirements the agile development methodology has been adopted and also continuous documentation. This means that each developer can write documentation to their code such that if other developers have to access members the classes expose then they can be able to gain the advantages of IntelliSense.


We will need to take advantage of the C#'s XML documentation capabilities .
I will attempt to provide a basic approach subject to improvement that will be used.
If consistently used some of the benefits that we seek to  accrue are:-
1.       Being able to generate documentation using tools such as Ndoc.
2.       Provide Intellisense just like any other  .NET  framework assemblies.

Ok enough with the banter.

Recommended tags

1.       <summary></summary>
Provides a summary of the object
Should  be used to describe a type or a type member.
The text for the <summary > tag is the only source of information about the type in IntelliSense and  will also be displayed in the object Browser Window.
2.       <param></param>
This is the name of a method parameter. Enclose the name in double quotation marks("").
To document multiple parameters, use multiple param tags.
The test here will be displayed in Intellisense, the Object Browser, and in the code comment web report.
3.       <returns> </return>
This is a description of a methods return value
4.       <exception></exception>
This tags will let you specify which exceptions can be thrown. It can be applied for methods, properties, event and indexers.
It takes an attribute cref  whose value is a reference to an exception that is available form t he current compilation environment. Examples of values which go in there are:-
                                                                                             i.            System.ArgumentException
                                                                                           ii.            System.ArgumentNullException
                                                                                          iii.            System.InvalidOperationException etc.


Basic approach
1.       Write the code
2.       When satisfied that everything is complete place the cursor directly above the class, interface,  procedure etc. and  press the backslash(\) thrice(\\\). This will create a template for the XML tags. If it’s a methods with parameters , a param tag  for each one will be created.
3.       when building  remember to configure the  project  properties to export an XML file. This file should be named {projectname}.xml.

Sample code following the convention is given below.


Creative Commons License
This work is licensed under a Creative Commons Attribution-NonCommercial-ShareAlike 3.0 United States License.

Saturday 12 January 2013

XP will die, will MySql follow too?

Death is something we have learnt to love to hate and apparently there is nothing we can do about it. The tech world is experiencing some very eminent deaths or maybe not. I will let you be the jury and judge because it is obvious the executioner will be somewhere in some board house.

 Well we now know for sure that the clock is ticking for windows XP and fast for that matter. The deadline for its support is in 2014. In the US windows 7 use has superseded XP and now the 10 year old tradition is about to end. I have a desktop machine that I bought way back when I was an undergraduate. It stacked somewhere and I use when I want to test stuff here and there. So what now for my old guard? Does it mean I won’t have a use for it? Does it mean that I will no longer be able to work with it? It is obvious I can’t run windows 7 on it for its specifications are way below. Of course I can still be able to run windows XP on my machine. The problem is that once Microsoft stops its support then it will instantly become a hacker’s malware haven. Without patches on common known bugs then the only solution may only be keeping the system completely offline, disconnected from the rest of the world. But what is the use of keeping offline in the world where virtualization and the cloud are being mentioned in every second sentence.

 But after reading this article by Microsoft http://windows.microsoft.com/en-US/windows-8/upgrade-to-windows-8, most of my worries were where quelled. They say that I and most of my kind will be able to upgrade to windows 8 without much of a hassle, expect that I will need to re-install the apps after the upgrade.

 On the other hand our so much loved Open source DBMS MySql lies in murky waters after Oracle’s acquisition of Sun Microsystems. This is the greatest cause of anxiety as we all know that MySql is a direct competitor to Oracles proprietary products. If the resignations seen by various software engineers are anything to go by, then we know we are in for a ride of our lives.

 During a discussion with a friend, he said that the death of MySql is improbable because the community is quite large and it could also serve as a publicity platform for Oracle. Beside several forks already exist with the leader in line being MariaDB. I actually am already playing around with it and am all loving. I should be blogging about it in the next few weeks’ right here.

Just as I said the execution of these two is totally out of our control. We can blog about it all we want and with Microsoft having already given an ultimatum we will keep our fingers crossed on what Oracle will say about MySql. So different Systems yet so similar destiny. #just saying.

Creative Commons License