Tuesday 29 January 2013

Configure a virtual host using XAMPP in windows


In this post you are going to learn how to configure a virtual host from a windows environment using XAMPP. XAMPP is pretty popular for all apprentices who really wanna learn their trade and it can’t get better than even having you own host instead of having to place everything  inside the htdocs folder. 
What do we mean by virtual host? Think of it as this , when you do domain name registration you start by doing a search to make sure that the name you look for is not taken. After you are successful then the next step involves getting a suitable host where your web application files will reside. In this post  we combine both those processes into one but only on your development machine.

1. Edit the file httpd-vhosts.conf found at the directory C:\xampp\apache\conf\extra.  Insert the following configuration script. 
<VirtualHost www.thetaitanstore.com:80>
    ServerAdmin admin@thetaitanstore.com
    DocumentRoot "D:\Virtual Sites hosted here\thetaitanstore"
    ServerName www.thetaitanstore.com
    ServerAlias thetaitanstore.com

   
    CustomLog "D:\Virtual Sites hosted here\thetaitanstore\logs\access" common

    <Directory />
           Options FollowSymLinks
           AllowOverride None
    </Directory>
    <Directory "D:\Virtual Sites hosted here\thetaitanstore">
           Options Indexes FollowSymLinks MultiViews
           AllowOverride FileInfo
           Order allow,deny
           allow from all
    </Directory>
</VirtualHost>

2. Since we now have told Apache that we have a new site we are hosting let tell the connections controller that if we type the address www.thetaitanstore.com the browser wont try to somewhere on the internet but just redirect around the localhost. This is done by editing the hosts file.  Its located in this path

C:\Windows\System32\drivers\etc

Insert the entry 

127.0.0.1  www.thetaitanstore.com

3. Now go on and restart Apache from services to detect the configuration changes. 

In the next post we will talk about how we can make this virtual host to support SSL(Secure Sockets Layer) communications. 

Monday 21 January 2013

C# documentation using XML comments

During my initial days in the field of software development when the waterfall method was the in thing, we were told that documentation was a task that was to be performed somewhere at the end of the software development process. However as the number of modules get complex and with constantly changing requirements the agile development methodology has been adopted and also continuous documentation. This means that each developer can write documentation to their code such that if other developers have to access members the classes expose then they can be able to gain the advantages of IntelliSense.


We will need to take advantage of the C#'s XML documentation capabilities .
I will attempt to provide a basic approach subject to improvement that will be used.
If consistently used some of the benefits that we seek to  accrue are:-
1.       Being able to generate documentation using tools such as Ndoc.
2.       Provide Intellisense just like any other  .NET  framework assemblies.

Ok enough with the banter.

Recommended tags

1.       <summary></summary>
Provides a summary of the object
Should  be used to describe a type or a type member.
The text for the <summary > tag is the only source of information about the type in IntelliSense and  will also be displayed in the object Browser Window.
2.       <param></param>
This is the name of a method parameter. Enclose the name in double quotation marks("").
To document multiple parameters, use multiple param tags.
The test here will be displayed in Intellisense, the Object Browser, and in the code comment web report.
3.       <returns> </return>
This is a description of a methods return value
4.       <exception></exception>
This tags will let you specify which exceptions can be thrown. It can be applied for methods, properties, event and indexers.
It takes an attribute cref  whose value is a reference to an exception that is available form t he current compilation environment. Examples of values which go in there are:-
                                                                                             i.            System.ArgumentException
                                                                                           ii.            System.ArgumentNullException
                                                                                          iii.            System.InvalidOperationException etc.


Basic approach
1.       Write the code
2.       When satisfied that everything is complete place the cursor directly above the class, interface,  procedure etc. and  press the backslash(\) thrice(\\\). This will create a template for the XML tags. If it’s a methods with parameters , a param tag  for each one will be created.
3.       when building  remember to configure the  project  properties to export an XML file. This file should be named {projectname}.xml.

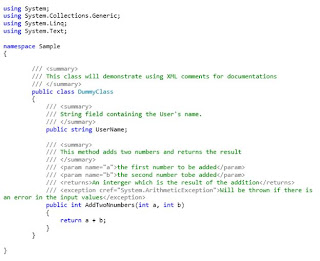
Sample code following the convention is given below.


Creative Commons License
This work is licensed under a Creative Commons Attribution-NonCommercial-ShareAlike 3.0 United States License.

Saturday 12 January 2013

XP will die, will MySql follow too?

Death is something we have learnt to love to hate and apparently there is nothing we can do about it. The tech world is experiencing some very eminent deaths or maybe not. I will let you be the jury and judge because it is obvious the executioner will be somewhere in some board house.

 Well we now know for sure that the clock is ticking for windows XP and fast for that matter. The deadline for its support is in 2014. In the US windows 7 use has superseded XP and now the 10 year old tradition is about to end. I have a desktop machine that I bought way back when I was an undergraduate. It stacked somewhere and I use when I want to test stuff here and there. So what now for my old guard? Does it mean I won’t have a use for it? Does it mean that I will no longer be able to work with it? It is obvious I can’t run windows 7 on it for its specifications are way below. Of course I can still be able to run windows XP on my machine. The problem is that once Microsoft stops its support then it will instantly become a hacker’s malware haven. Without patches on common known bugs then the only solution may only be keeping the system completely offline, disconnected from the rest of the world. But what is the use of keeping offline in the world where virtualization and the cloud are being mentioned in every second sentence.

 But after reading this article by Microsoft http://windows.microsoft.com/en-US/windows-8/upgrade-to-windows-8, most of my worries were where quelled. They say that I and most of my kind will be able to upgrade to windows 8 without much of a hassle, expect that I will need to re-install the apps after the upgrade.

 On the other hand our so much loved Open source DBMS MySql lies in murky waters after Oracle’s acquisition of Sun Microsystems. This is the greatest cause of anxiety as we all know that MySql is a direct competitor to Oracles proprietary products. If the resignations seen by various software engineers are anything to go by, then we know we are in for a ride of our lives.

 During a discussion with a friend, he said that the death of MySql is improbable because the community is quite large and it could also serve as a publicity platform for Oracle. Beside several forks already exist with the leader in line being MariaDB. I actually am already playing around with it and am all loving. I should be blogging about it in the next few weeks’ right here.

Just as I said the execution of these two is totally out of our control. We can blog about it all we want and with Microsoft having already given an ultimatum we will keep our fingers crossed on what Oracle will say about MySql. So different Systems yet so similar destiny. #just saying.

Creative Commons License

Thursday 10 January 2013

Creating a MySql view from phpmyadmin

Recently a friend of mine contacted on how to simplify a query. The query in question involved so many joins that were even to him getting a little frustrating trying to master every property . So we set out on the voyage. The solution to his problem being creating a view which would simplify his query from what is shown here below to a simple select * from view_name.
1. Open phpmyadmin by using the address http://localhost/phpmyadmin from your favorite browser.

2. This should list on the left all the databases that mysql server on your machine is hosting. Click on the database that has the tables you are reading data from. Am assuming you keep all related data in the same database.

 3. Click on the SQL tab. This should give you a large text area where you will be required to paste your original apparently large query.

 4. Run the query by clicking “GO”.

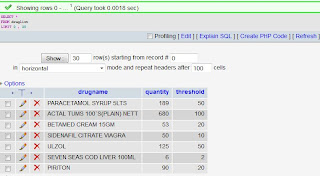
5. This should return a result set if the query is ok. It’s at this point that we create a view which upon select * from it will give us exactly the same result as what we currently have from the complex query. A query like the one in the image below might need simplification.
At the bottom of this page you will usually see various options.
6. Click on the CREATE VIEW option. It returns a similar page as the image below. Give the view a name and check the CASCADED CHECK OPTION. When done click “GO”.
NOTES We now have a view which follows the table specified in the query. The cascaded check option means that we have a bidirectional communication between the view and the related tables. If we delete anything from the view it’s deleted from the table and the reverse is also true. We can access the same data now by simply using a simple select query.

Creative Commons License
This work is licensed under a Creative Commons Attribution-NonCommercial-ShareAlike 3.0 United States License.